
WireGuard is the next generation VPN. It has good performance, it's very secure and easy to use.
Let's see how to configure it from a debian GNU/Linux server with Windows clients.


root@host:~# apt update
root@host:~# apt install wireguard
root@host:~# cd /etc/wireguard/
root@host:~# umask 077
root@host:~# wg genkey > wg-private.key
root@host:~# wg pubkey < wg-private.key > wg-public.key
root@host:~# cat wg-private.key
2GIURzIDBgI1Y+1Ei+i2C5kEOR53mH172MaidaVpD3M=
# define the WireGuard service
[Interface]

# contents of file wg-private.key that was recently created
PrivateKey = 2GIURzIDBgI1Y+1Ei+i2C5kEOR53mH172MaidaVpD3M=

# UDP service port; 51820 is a common choice for WireGuard
ListenPort = 51820
# indicate that wg0 should be created when the system boots, and on ifup -a
auto wg0

# describe wg0 as an IPv4 interface with static address
iface wg0 inet static

        # static IP address
        address 10.0.2.1/24

        # before ifup, create the device with this ip link command
        pre-up ip link add $IFACE type wireguard

        # before ifup, set the WireGuard config from earlier
        pre-up wg setconf $IFACE /etc/wireguard/$IFACE.conf

        # after ifdown, destroy the wg0 interface
        post-down ip link del $IFACE

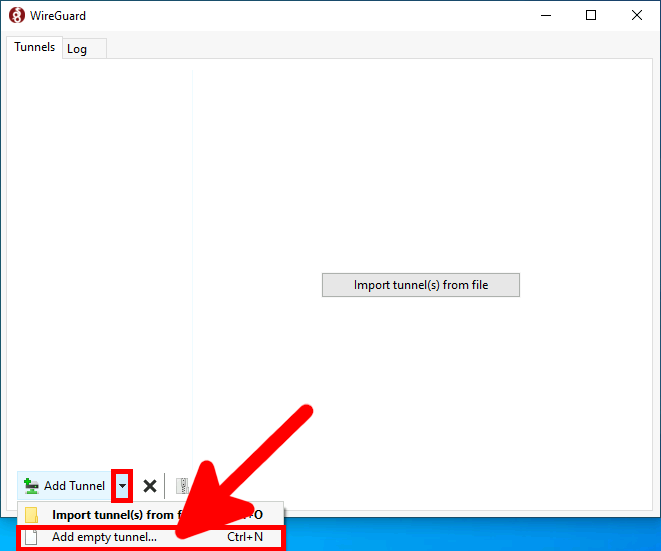
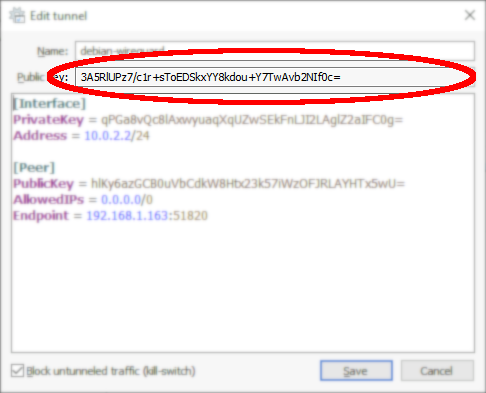
Download the latest software on the official website https://wireguard.com/, and install.
root@host:~# cat /etc/wireguard/wg-public.key
hlKy6azGCB0uVbCdkW8Htx23k57iWzOFJRLAYHTx5wU=
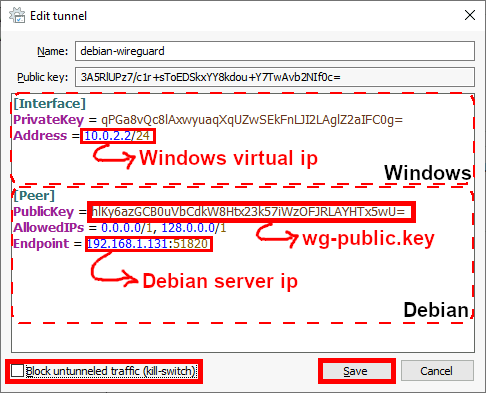
[Interface]
PrivateKey = qPGa8vQc8lAxwyuaqXqUZwSEkFnLJI2LAglZ2aIFC0g=
Address = 10.0.2.2/24

[Peer]
PublicKey = hlKy6azGCB0uVbCdkW8Htx23k57iWzOFJRLAYHTx5wU=
AllowedIPs = 0.0.0.0/1, 128.0.0.0/1
Endpoint = 192.168.1.131:51820
root@host:~# ifup wg0
root@host:~# wg set wg0 peer CLIENT_PUBLIC_KEY allowed-ips 0.0.0.0/0
root@host:~# wg show
interface: wg0
  public key: hlKy6azGCB0uVbCdkW8Htx23k57iWzOFJRLAYHTx5wU=
  private key: (hidden)
  listening port: 51820

peer: 3A5R|UPz7/c1r+sToEDSkxYY8kdou+Y7TwAvb2NIf0c=
  endpoint: WINDOWS_IP:52925
  allowed ips: 0.0.0.0/0
  latest handshake: 6 seconds ago
  transfer: 14.44 KiB received, 1.87 KiB sent
 # indicate that wg0 should be created when the system boots, and on ifup -a
auto wg0

# describe wg0 as an IPv4 interface with static address
iface wg0 inet static

        # static IP address
        address 10.0.2.1/24

        # before ifup, create the device with this ip link command
        pre-up ip link add $IFACE type wireguard

        # before ifup, set the WireGuard config from earlier
        pre-up wg setconf $IFACE /etc/wireguard/$IFACE.conf

        # after ifdown, destroy the wg0 interface
        post-down ip link del $IFACE
        # allowed clients
	up wg set wg0 peer CLIENT01_PUBLIC_KEY allowed-ips 0.0.0.0/0
	up wg set wg0 peer CLIENT02_PUBLIC_KEY allowed-ips 0.0.0.0/0
net.ipv4.ip_forward = 1
root@host:~# sysctl -p /etc/sysctl.conf
root@host:~# cat /proc/sys/net/ipv4/ip_forward
1
root@host:~# nft add table ip NAT
root@host:~# nft add chain ip NAT my_masquerade '{ type nat hook postrouting priority 100; }'
root@host:~# nft add rule NAT my_masquerade ip saddr { 10.0.2.0/24 } oifname ens224 masquerade
root@host:~# nft add rule ip filter INPUT udp dport 51820 ct state new,established counter accept
root@host:~# nft add rule ip filter OUTPUT udp sport 51820 ct state established counter accept
#!/usr/sbin/nft -f

flush ruleset

table inet filter {
        chain input {
                type filter hook input priority 0;
		udp dport 51820 ct state new,established counter accept
        }
        chain forward {
                type filter hook forward priority 0;
        }
        chain output {
                type filter hook output priority 0;
		udp sport 51820 ct state established counter accept
        }
}
table ip NAT {
        chain my_masquerade {
                type nat hook postrouting priority 100; policy accept;
                ip saddr { 10.0.2.0/24 } oifname "ens224" masquerade comment "outgoing NAT"
        }
}
root@host:~# root@host:~# systemctl enable nftables.service
root@host:~# modprobe wireguard && echo module wireguard +p > /sys/kernel/debug/dynamic_debug/control
root@host:~# tail -f /var/log/syslog
root@host:~# modprobe wireguard && echo module wireguard -p > /sys/kernel/debug/dynamic_debug/control
Contact :