How to Monitor Network Bandwidth with SNMP and Munin on GNU/Linux
- Last updated: Jan 23, 2026

Whether it is for internet or local network links, it can be useful to have a graphical representation of bandwidth usage over time.
This article explains how to achieve this using the SNMP protocol combined with Munin.
According to Wikipedia, Munin is a free and open-source monitoring tool designed for system, network, and infrastructure monitoring.
It comes with a wide range of built-in plugins and tools to monitor CPU, memory, network interfaces, disks, and more.
Unfortunately, I could not find a plugin that fully met my requirements, so I decided to develop my own.
Am I willing to share it here for free? You will find out by reading the rest of this article…
Network Architecture
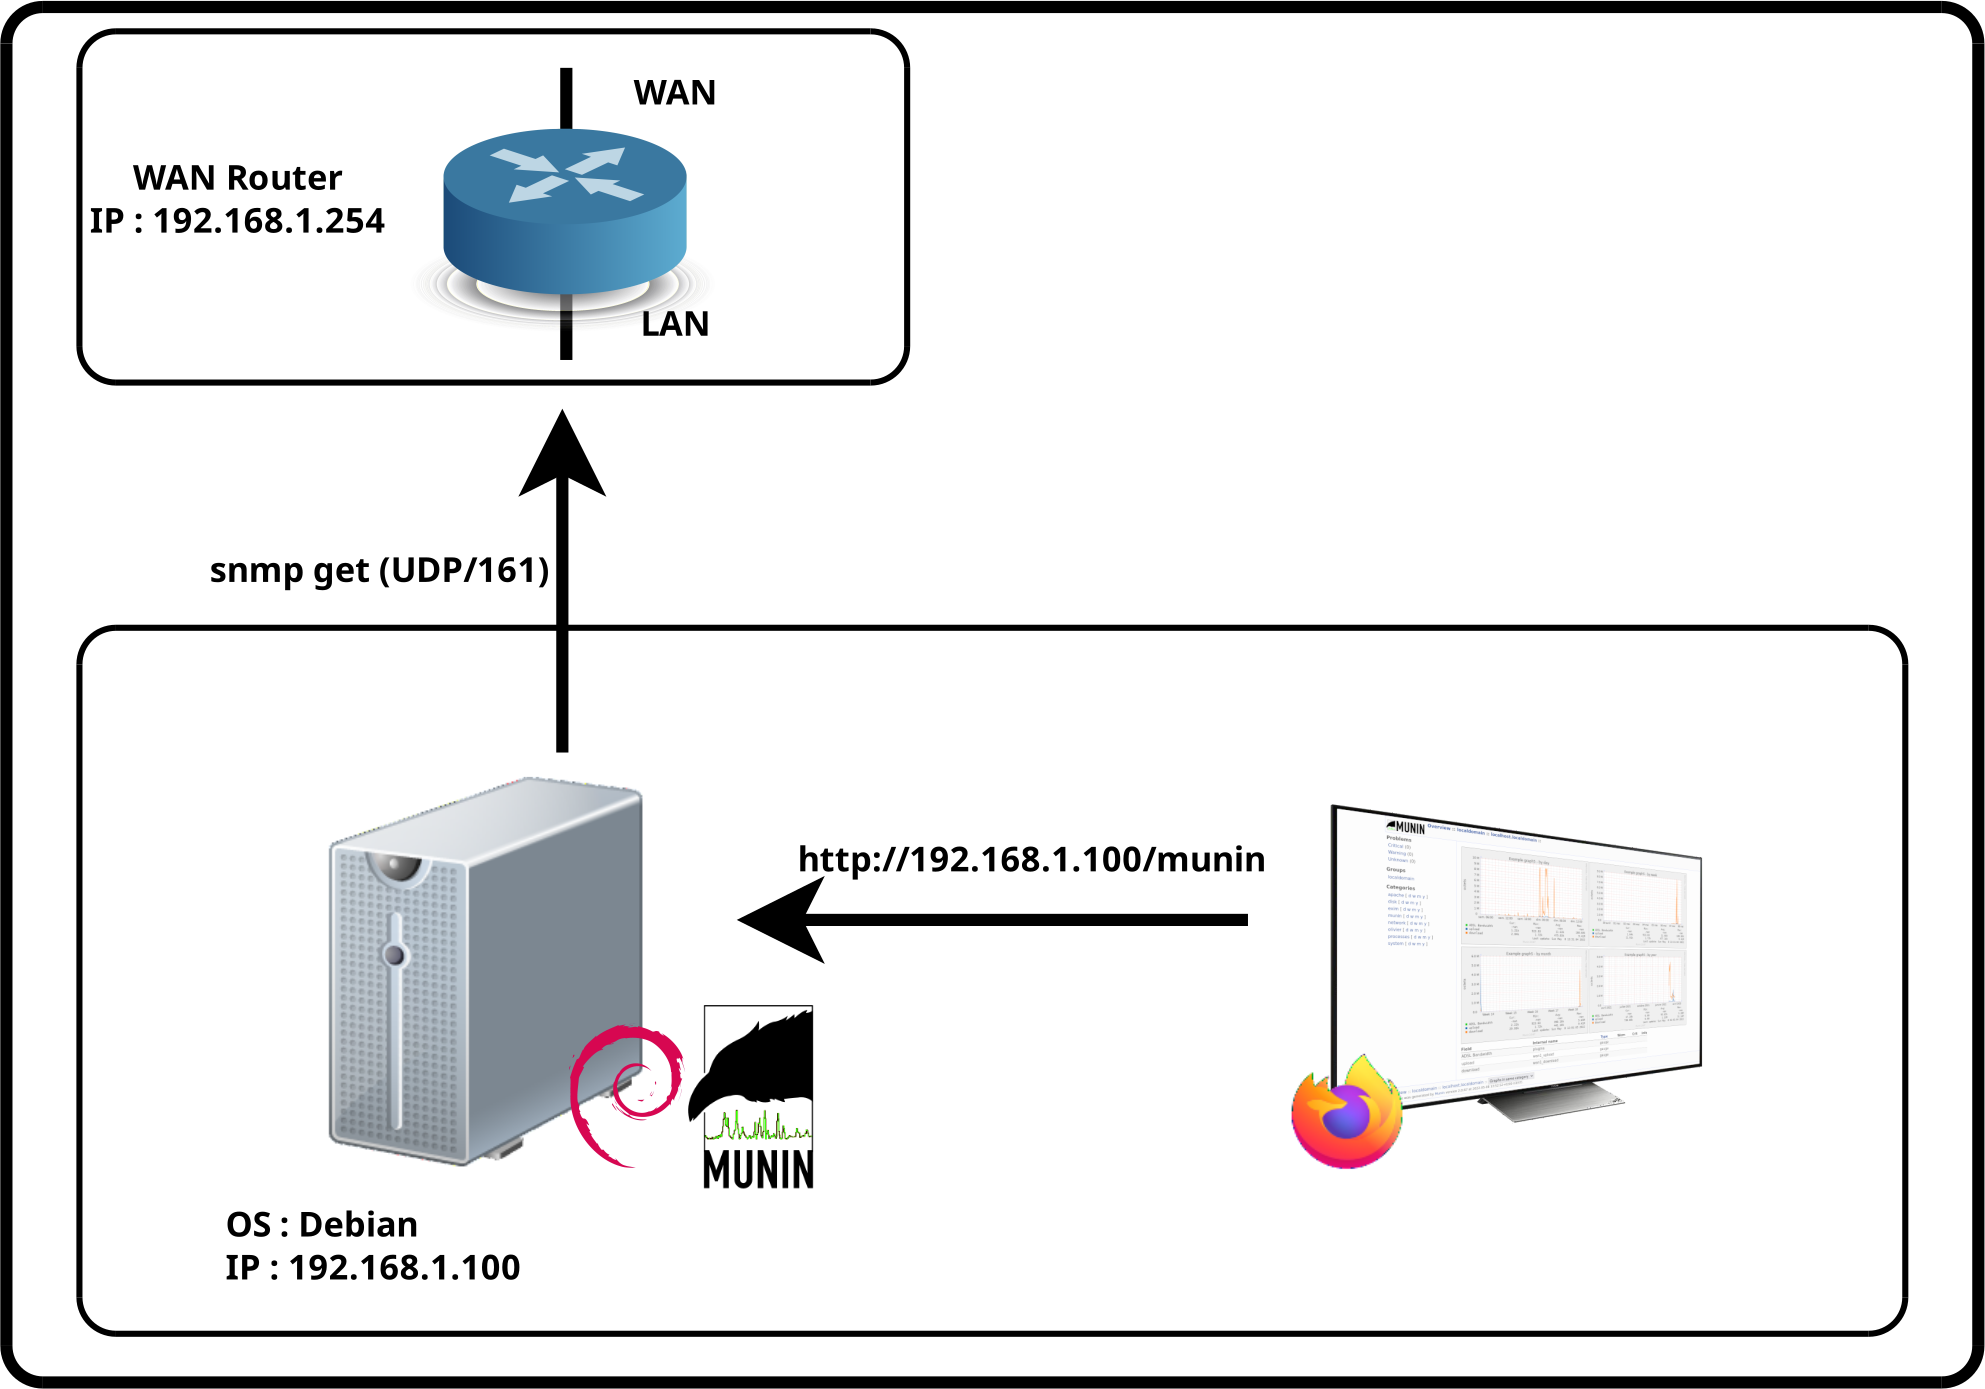
In this example, the goal is to monitor the WAN link of a router using SNMP and Munin.
SNMP
Introduction
Simple Network Management Protocol (SNMP) is an Internet standard protocol used to collect and organize information from managed devices on IP networks, as well as to modify that information in order to change device behavior. Devices that commonly support SNMP include cable modems, routers, switches, servers, workstations, printers, and more.
As a reminder, SNMP can be used in several ways: snmpget to retrieve information, snmpset to configure or control a device, and snmptrap, which allows an agent to send notifications to a manager.
In this article, we will use snmpget with SNMPv3, the most secure version of the protocol, as it provides cryptographic security.
Therefore, the router will be configured to use SNMPv3 with AES as the encryption algorithm and SHA-1 as the authentication algorithm.
MIB
-
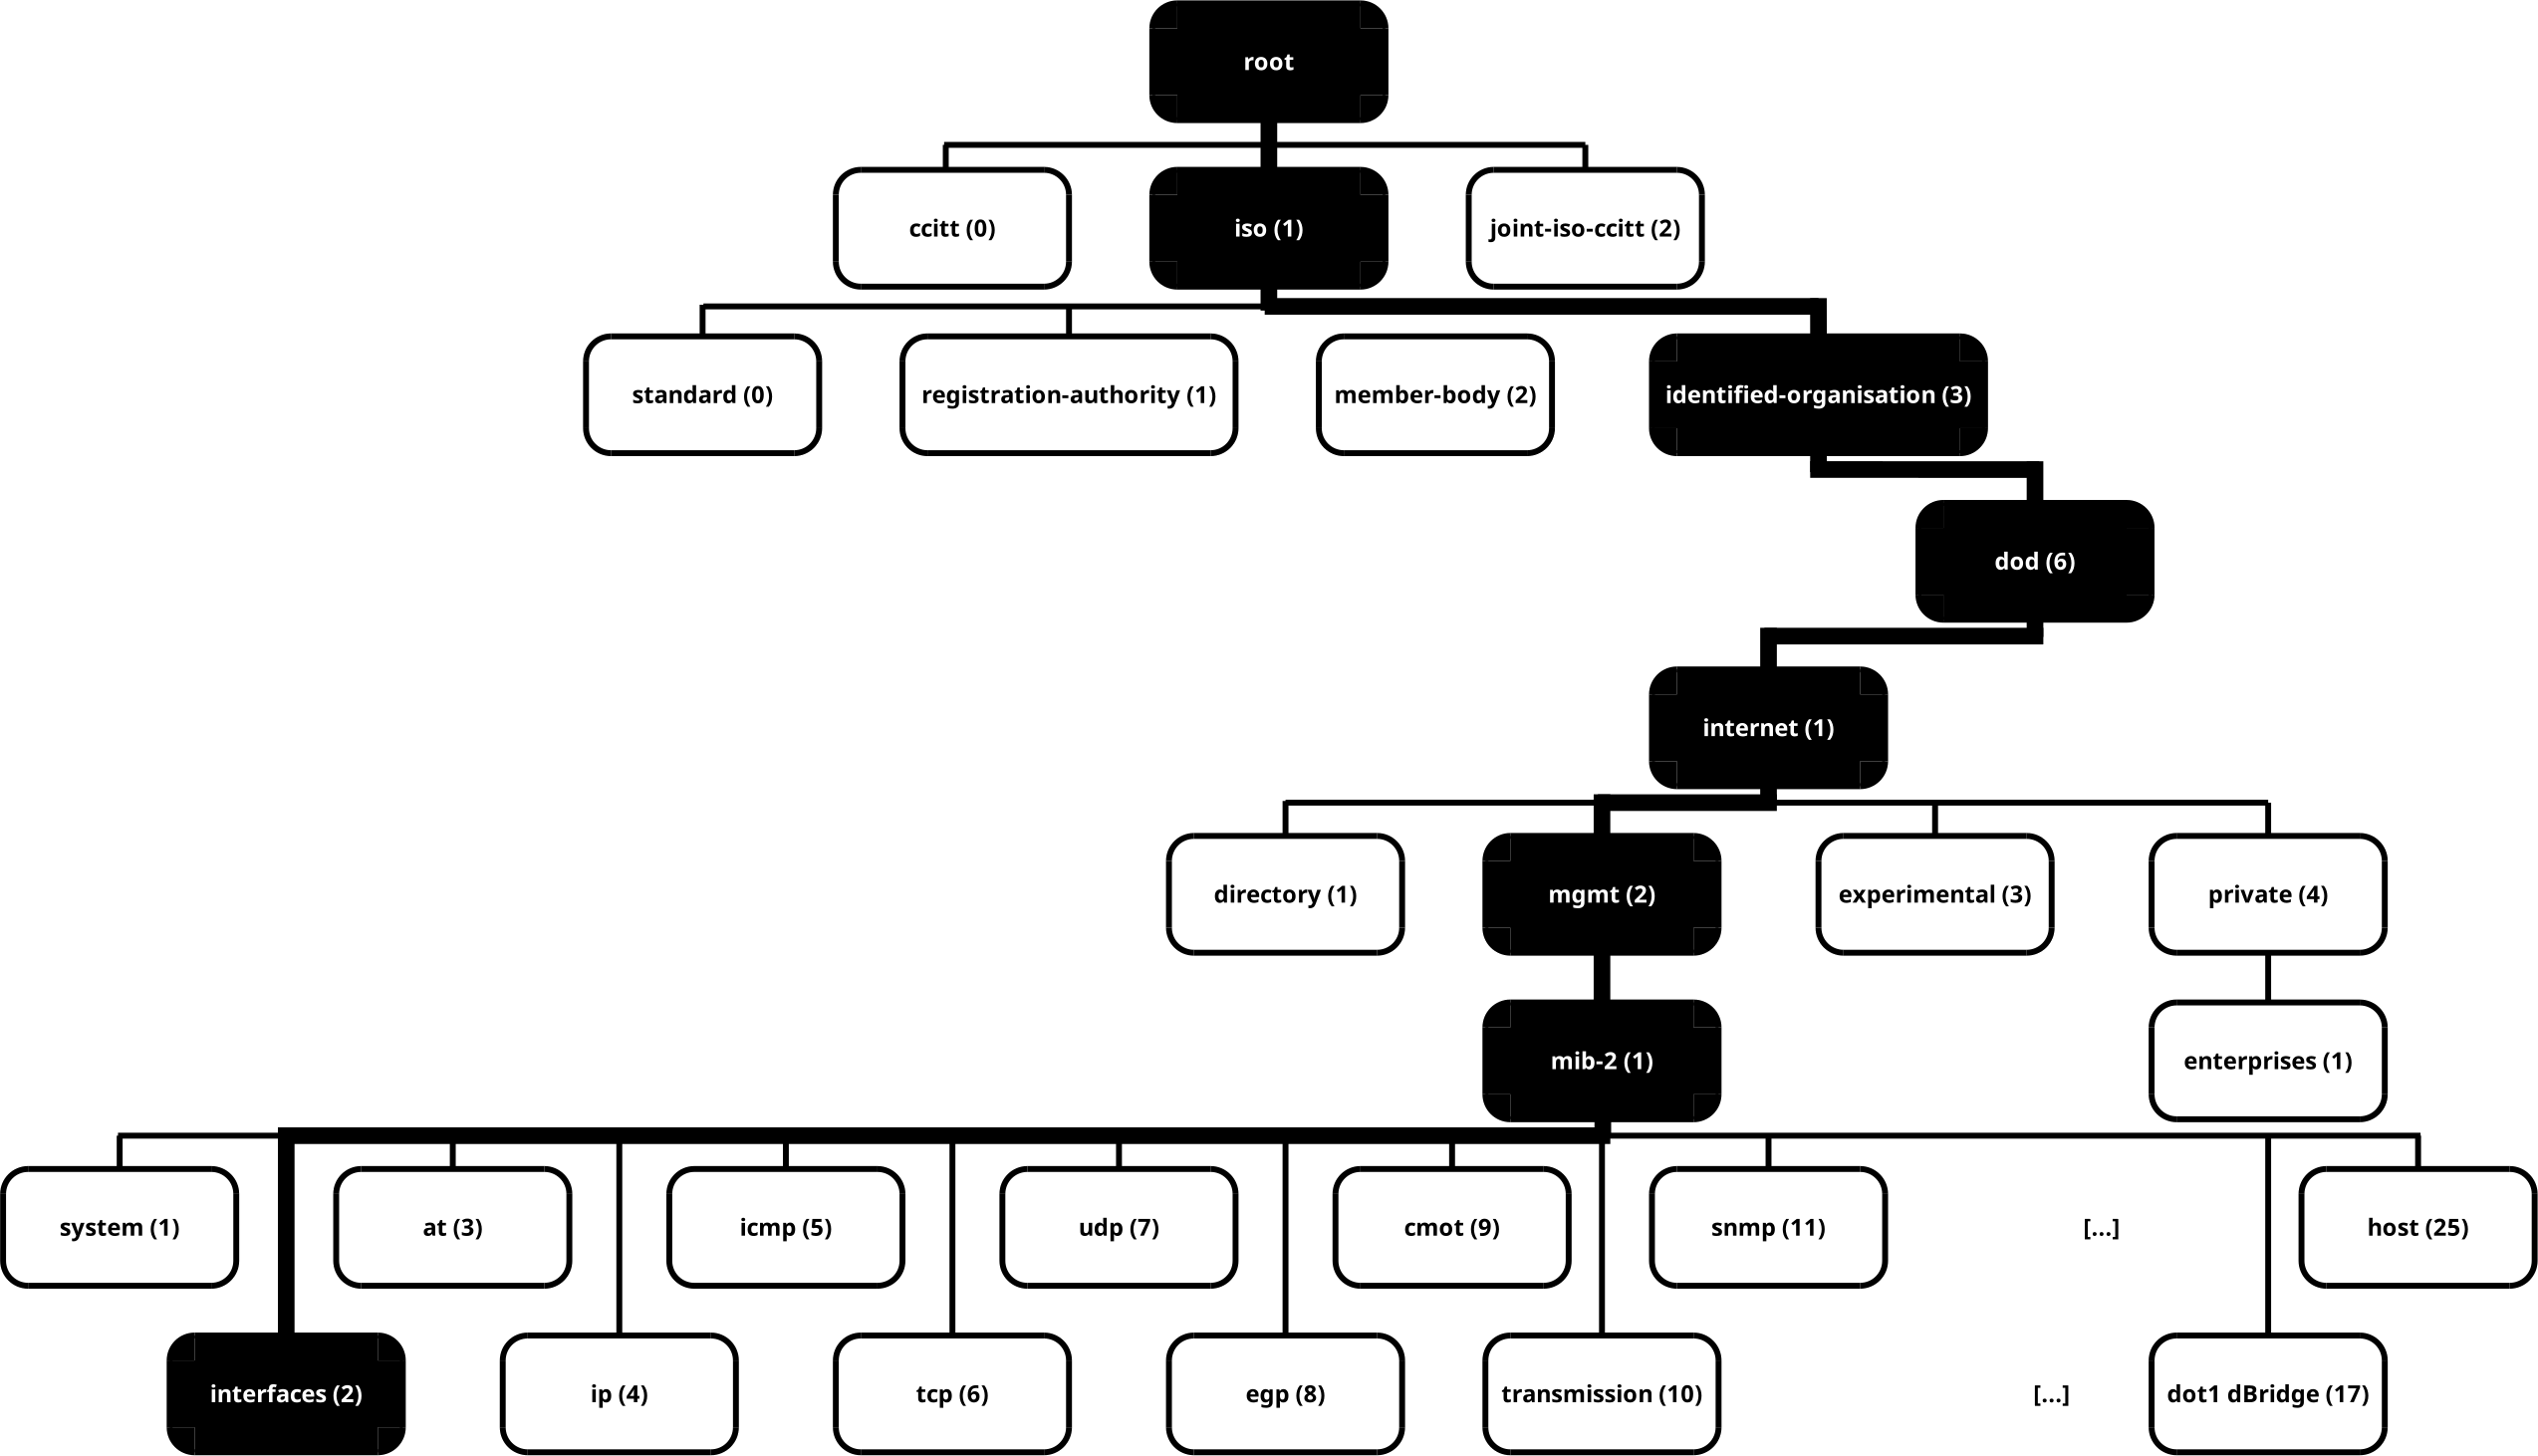
SNMP information is stored in a hierarchical tree structure called the MIB (Management Information Base). To retrieve network-related information, we need to explore the
1.3.6.1.2.1.2subtree.
Net-SNMP Applications
There are many tools available to interact with the SNMP protocol. In this article, I use the Net-SNMP tools.
- They provide access to several command-line tools:
snmpwalk: retrieves a subtree of management values using SNMP GETNEXT requestssnmpget: queries a network device using SNMP GET requests- and more…
Installation
- Install the package on Debian:
root@host:~# apt update && apt-get install snmpUsage
- Options:
-On: display OIDs numerically-Oe: remove symbolic labels from enumeration values-OQ: suppress type information when displaying varbind values-Os: display MIB object names-t 10: specify the timeout in seconds between retries-l authPriv: set the security level for SNMPv3 messages-v 3: specify SNMP protocol version 3
snmpwalk
- Use
snmpwalkto retrieve all information from a subtree:
root@host:~# snmpwalk -OQse -v 3 -t 10 -l AuthPriv -u USER -a SHA1 -A AUTH_PASSWORD -x AES -X ENCRYPT_PASSWORD 192.168.1.254 1.3.6.1.2.1.2
iso.3.6.1.2.1.2.2.1.2.1 = "LAN"
iso.3.6.1.2.1.2.2.1.2.2 = "WAN"
iso.3.6.1.2.1.2.2.1.2.7 = "Resrved"
[…]
iso.3.6.1.2.1.2.2.1.10.1 = 993231759
iso.3.6.1.2.1.2.2.1.10.2 = 44681268
iso.3.6.1.2.1.2.2.1.11.1 = 21739
iso.3.6.1.2.1.2.2.1.12.1 = 657070
[…]
iso.3.6.1.2.1.2.2.1.15.1 = 239874
iso.3.6.1.2.1.2.2.1.16.1 = 3744831080
iso.3.6.1.2.1.2.2.1.16.2 = 671461169
[…]
iso.3.6.1.2.1.2.2.1.17.1 = 12892
iso.3.6.1.2.1.2.2.1.17.2 = 47095
As shown above, it can be difficult to determine which information needs to be processed. To translate the received data into human-readable output, we need to install the snmp-mibs-downloader package, which provides the required MIB files.
- Edit
/etc/apt/sources.listand add:
deb http://deb.debian.org/debian/ bullseye main non-free
deb-src http://deb.debian.org/debian/ bullseye main non-free- Install
snmp-mibs-downloader:
root@host:~# apt update && apt install snmp-mibs-downloader- Edit
/etc/snmp/snmp.conf:
# As the snmp packages come without MIB files due to license reasons, loading
# of MIBs is disabled by default. If you added the MIBs you can reenable
# loading them by commenting out the following line.
#mibs :
mibs ALL
# If you want to globally change where snmp libraries, commands and daemons
# look for MIBS, change the line below. Note you can set this for individual
# tools with the -M option or MIBDIRS environment variable.
#
# mibdirs /usr/share/snmp/mibs:/usr/share/snmp/mibs/iana:/usr/share/snmp/mibs/ietf- Run
snmpwalkagain; the output should now be human-readable:
root@host:~# snmpwalk -OQse -v 3 -t 10 -l AuthPriv -u USER -a SHA1 -A AUTH_PASSWORD -x AES -X ENCRYPT_PASSWORD 192.168.1.254 1.3.6.1.2.1.2
ifDescr.1 = LAN
ifDescr.2 = WAN
ifDescr.7 = Resrved
[…]
ifInOctets.1 = 1247598139
ifInOctets.2 = 4105313719
ifInUcastPkts.1 = 4751
ifInNUcastPkts.1 = 146063
[…]
ifInUnknownProtos.1 = 61144
ifOutOctets.1 = 3285593712
ifOutOctets.2 = 2913538784
[…]
ifOutUcastPkts.1 = 2037
ifOutUcastPkts.2 = 13573
We can now determine that the relevant SNMP counters for bandwidth monitoring are ifInOctets.2 (1.3.6.1.2.1.2.2.1.10.2) for inbound traffic and ifOutOctets.2 (1.3.6.1.2.1.2.2.1.16.2) for outbound traffic.
snmpget
- Example using snmpget:
root@host:~# snmpget -OQse -v 3 -t 10 -l AuthPriv -u USER -a SHA1 -A AUTH_PASSWORD -x AES -X ENCRYPT_PASSWORD 192.168.1.254 1.3.6.1.2.1.2.2.1.10.1
ifInOctets.1 = 854863486
Munin
Munin provides a web interface to display collected metrics and graphs. As a prerequisite, it requires a web server. In this setup, Apache will be used.
Munin Installation
Apache Web Server
In this section, we install the Apache web server along with the fcgid module, which is required to execute Munin CGI scripts efficiently.
root@host:~# apt update && apt install apache2 libapache2-mod-fcgid- Enable the fcgid module:
root@host:~# a2enmod fcgidMunin
- Install the Munin packages:
root@host:~# apt update && apt install munin munin-node munin-plugins-extra- Enable the Munin Apache configuration:
root@host:~# a2enconf munin- Edit the
/etc/apache2/conf-enabled/munin.conffile:
ScriptAlias /munin-cgi/munin-cgi-graph /usr/lib/munin/cgi/munin-cgi-graph
Alias /munin/static/ /var/cache/munin/www/static/

<Directory /var/cache/munin/www>
    Require all granted
    Options None
</Directory>

<Directory /usr/lib/munin/cgi>
    Require all granted
    <IfModule mod_fcgid.c>
        SetHandler fcgid-script
    </IfModule>
    <IfModule !mod_fcgid.c>
        SetHandler cgi-script
    </IfModule>
</Directory>


# ***** SETTINGS FOR CGI/CRON STRATEGIES *****

# pick _one_ of the following lines depending on your "html_strategy"
# html_strategy: cron (default)
Alias /munin /var/cache/munin/www- Restart the Apache web server:
root@host:~# systemctl restart apache2Bandwidth Plugin
- Install the required prerequisites:
root@host:~# apt update && apt install bc snmp- Create the file
/usr/share/munin/plugins/bandwidthand carefully update the following variables:AUTH_PASSWORD: SHA authentication passwordENCRYPT_PASSWORD: AES encryption passwordUSER: SNMP usernameHOST: IP address of the network deviceOID_UPLOAD: OID of the upload counterOID_DOWNLOAD: OID of the download counter
#!/bin/sh
# Role : munin script to collect upload and download values of an interface
# Autor : http://shebangthedolphins.net/
# 1.0 first version

AUTH_PASSWORD="AUTH_PASSWORD"
ENCRYPT_PASSWORD="ENCRYPT_PASSWORD"
USER="user"
HOST="192.168.1.254"
OID_UPLOAD="1.3.6.1.2.1.2.2.1.16.2"
OID_DOWNLOAD="1.3.6.1.2.1.2.2.1.10.2"

output_config() {
    echo "graph_category network"
    echo "graph_title Bandwidth"
    echo "plugins.label WAN Bandwidth"
    echo "graph_vlabel bytes"
    echo "wan1_upload.label upload"
    echo "wan1_download.label download"
}

output_values() {
    printf "wan1_upload.value %d\n" $(snmp_wan_upload) &
    printf "wan1_download.value %d\n" $(snmp_wan_download)
    wait
}

snmp_wan_upload() {
        TimeEnd_UL=$(date +"%s") #epoch time
        if [ ! -f /tmp/wan_upload ]; then sleep 5s; snmpget -OQne -v 3 -t 10 -l AuthPriv -u "$USER" -a SHA1 -A "$AUTH_PASSWORD" -x AES -X "$ENCRYPT_PASSWORD" "$HOST" "$OID_UPLOAD" | awk '{ print $3 }' > /tmp/wan_upload; sleep 5s; TimeEnd_UL=$(date +"%s"); fi #at first launch creation of the /tmp/wan_upload file
        ifInOctets_WAN1=$(cat /tmp/wan_upload) #value in bytes of the last reading (5 minutes ago)
        TimeStart_UL=$(date -r /tmp/wan_upload +"%s") #epoch time of the modification of the file /tmp/wan_upload

        ifInOctets_WAN2=$(snmpget -OQne -v 3 -t 10 -l AuthPriv -u "$USER" -a SHA1 -A $AUTH_PASSWORD -x AES -X $ENCRYPT_PASSWORD "$HOST" "$OID_UPLOAD" | awk '{ print $3 }' | tee /tmp/wan_upload) #current reading (+5 minutes compared to the previous reading)
        Time_UL=$(($TimeEnd_UL-$TimeStart_UL)) #difference in seconds between the current epoch time and that of the /tmp/wan_upload file
        Result_UL=$(echo "scale=0;($ifInOctets_WAN2 - $ifInOctets_WAN1)/($Time_UL)" | bc) #difference in bytes between the -5min record and the current record
        if [ $Result_UL -gt 0 ]; then #if difference is less than 0 then normal operation
                echo "scale=0;($ifInOctets_WAN2 - $ifInOctets_WAN1)/($Time_UL)" | bc
        else #if difference is less than 0 then the counter has been reset after the value 4294967295, the counter is reset to 0
                echo "scale=0;($ifInOctets_WAN2 - $ifInOctets_WAN1 + 4294967295)/($Time_UL)" | bc
        fi
}
snmp_wan_download() {
        TimeEnd_DL=$(date +"%s") #epoch time
        if [ ! -f /tmp/wan_download ]; then sleep 5s; snmpget -OQne -v 3 -t 10 -l AuthPriv -u "$USER" -a SHA1 -A "$AUTH_PASSWORD" -x AES -X "$ENCRYPT_PASSWORD" "$HOST" "$OID_DOWNLOAD" | awk '{ print $3 }' > /tmp/wan_download; sleep 5s; TimeEnd_DL=$(date +"%s"); fi #at first launch creation of the file /tmp/wan_download
        ifOutOctets_WAN1=$(cat /tmp/wan_download) #value in bytes of the last reading (5 minutes ago)
        TimeStart_DL=$(date -r /tmp/wan_download +"%s") #epoch time of the modification of the file /tmp/wan_download

        ifOutOctets_WAN2=$(snmpget -OQne -v 3 -t 10 -l AuthPriv -u "$USER" -a SHA1 -A "$AUTH_PASSWORD" -x AES -X "$ENCRYPT_PASSWORD" "$HOST" "$OID_DOWNLOAD" | awk '{ print $3 }' | tee /tmp/wan_download) #current reading (+5 minutes compared to the previous reading)
        Time_DL=$(($TimeEnd_DL-$TimeStart_DL)) #difference in seconds between the current epoch time and that of the /tmp/wan_download file
        Result_DL=$(echo "scale=0;($ifOutOctets_WAN2 - $ifOutOctets_WAN1)/($Time_DL)" | bc) #difference in bytes between the -5min record and the current record
        if [ $Result_DL -gt 0 ]; then
                echo "scale=0;($ifOutOctets_WAN2 - $ifOutOctets_WAN1)/($Time_DL)" | bc
        else
                echo "scale=0;($ifOutOctets_WAN2 - $ifOutOctets_WAN1 + 4294967295)/($Time_DL)" | bc
        fi
}

output_usage() {
    printf >&2 "%s - munin plugin to graph bandwith links\n" ${0##*/}
    printf >&2 "Usage: %s [config]\n" ${0##*/}
}

case $# in
    0)
        output_values
        ;;
    1)
        case $1 in
            config)
                output_config
                ;;
            *)
                output_usage
                exit 1
                ;;
        esac
        ;;
    *)
        output_usage
        exit 1
        ;;
esac- Add execute permission to the plugin:
root@host:~# chmod +x /usr/share/munin/plugins/bandwidth- Create a symbolic link to enable the plugin:
root@host:~# ln -s /usr/share/munin/plugins/bandwidth /etc/munin/plugins/bandwidth- Edit the
/etc/munin/plugin-conf.d/munin-nodefile and add the following configuration:
[bandwidth]
user root- Restart the
munin-nodeservice:
root@host:~# systemctl restart munin-nodeWeb Interface
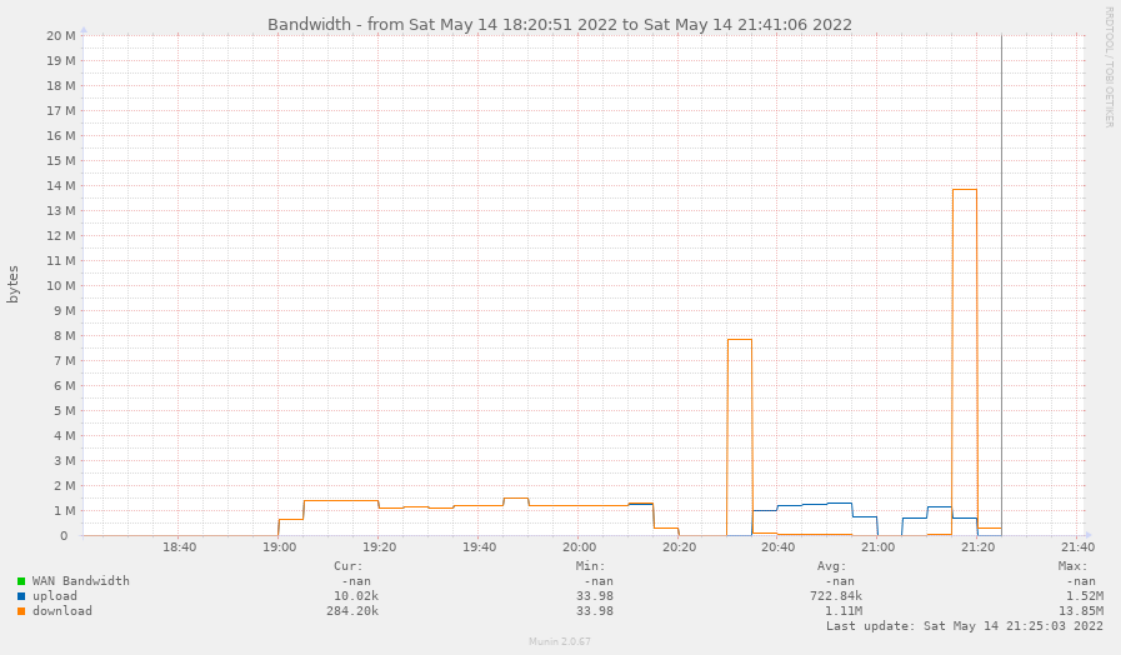
- Take a ☕, wait a few minutes for the first data to be collected, then connect to your Munin server at
http://192.168.1.100/munin/. Click on localdomain, then select Bandwidth.

- You should now see the Bandwidth graphs:

Useful Commands
- Manually run the plugin:
root@host:~# munin-run bandwidth- Display the current plugin status:
root@host:~# /usr/sbin/munin-node-configure | grep bandwidth